
A little while ago, we stumbled across @olyaupcycle's gorgeous Instagram account which features a range of DIY projects that have inspired us. We couldn't wait to feature her work and share her tips on some upcycling content to get you inspired for your next project.
Olya began upcycling during the COVID-19 pandemic and has since crafted some stunning upcycles that we share with you in this Upcycling series. Head over to her Instagram account @OlyaUpcycle to view some of her gorgeous DIY projects.
In this first article, we discuss Olya's journey and Olya has kindly shared some of her best tips and tricks with us on upcycling a sideboard or chest of drawers!
Let's dive in and gather some of her valuable tips!
1) What inspired you to get into the world of upcycling, and why do you find it rewarding?
I was in lockdown and got a chance to spend a lot of time at home with my… what started to look like dated furniture. I wanted a creative project to relieve stress as my full time job is with the NHS in mental health. I found that I could go into my therapeutic creative bubble, upcycling and creating something pretty and functional, and that was totally satisfying!
2) For beginners, what factors should they consider when selecting the right sideboard for an upcycling project, and how important is preparation?
As a beginner, ideally, pick an unpainted real wood piece with no major defects. (Laminates, veneer etc need a little more care).
Prep is totally KEY to a smooth journey to the end, with a lasting smooth finish. Despite some paints saying ‘no prep required’ as a selling point, when I have done that, things have gone totally wrong. I have been able to scrape the paint off with my nails! I really would thoroughly clean with a product like sugar soap to stop the grime preventing the paint from grabbing.
At a minimum ‘scuff sand’ the piece, with 120 grit, for better paint adhesion. I often work with 80, 120 then 240 grit, progressively. I will mostly prime my sideboard, to prevent bleed-through of oils/tannins from the wood leaving a blotchy/patchy finish and primer helps with better paint adhesion. It really is all in the Prep!
Consider elements of your design but hold it lightly in mind, as the design may evolve as you journey through your project.
3) Paint or stain? Can you suggest some popular and trendy finishes for upcycled sideboards and the effect they can create?
A real trend at present is a ‘Paint Wash’ for a more raw wood look using neutrals. This is a diluted paint, I often use 1: 5 ratio, paint to water. When you remove often dated orangy, lack lustre varnishes/wax and get that lovely raw wood look underneath.
Sealing again with varnish can again darken the look, losing the raw tone you were after. So a paint wash applied with a brush along the grain and then almost immediately wiped off, with smooth long strokes, creates a neutral barrier holding that raw look before sealing with varnish.
4) How can we incorporate creative techniques like distressing or stenciling to add character to the sideboard, and what tips do you have for achieving the best results?
I love a stencil to add interest to a project either on the inside of the doors or drawer sides or on the fronts/sides of the sideboard. When I started I would do practices of stenciling on a sheet of paper to realise what worked best and especially how to manage a repeating pattern.
Tape the stencil in place with frog tape. I use a stenciling brush that is stubby and firm, unlike normal brushes. I dab some paint on the brush and dab it onto a sheet of paper first, to make sure the brush is not too loaded with paint as that can cause bleeding through the stencil (you really do not want to overload the brush!), then just dab away and peel off at an angle.
Adding browning or black wax can really add depth to your paint finish in a relatively easy way to create an aged look.
5) Upcycling is known for its sustainability. How can we repurpose materials or use eco-friendly alternatives to create a greener sideboard makeover?
Old side boards are one of my favourite upcycles to do. Vintage furniture was made to last with real craft and skill, and often outstanding woods, so it’s a gift to be able to Flip them!
My tip would be to use low VOC paints, and water-based varnishes, eco-friendly strippers whenever possible. There are some outstanding ones on the market to meet the needs of eco-conscious decorators/upcyclers. Re-use the hardware by cleaning and adding a new finish to it when it fits your desired look.
6) Many worry about the durability of upcycled furniture. What tips can you provide to ensure the sideboard stands the test of time after the upcycling process?
Durability of a finish really has a lot to do with the preparation of the sideboard even before a lick of paint! I would say do not rush any part of a process. If the instructions on your paint are not to recoat for 2 hours then be patient, each product has its own instructions, follow them and take no shortcuts, and the finish should last the test of time.
I also recommend a good few coats of a water-based varnish for that extra protection, despite a product stating its ‘self-sealing’.
7) DIY projects can be daunting. What advice do you have for readers who want to infuse their personal style into the sideboard upcycling project while keeping it achievable?
I would say start small and start with real wood if possible. I think the key is to manage your expectations as to how much time you have in relation to when you think it will be done.
Look at sites like this for advice - do some homework, watch clips of how things are done, get familiar with some brilliant upcyclers on social media for ideas and advice and tips and techniques.
This just helps to build confidence.
And most of all remember, its Upcycling, so if it's not working the first time the beauty is you can upcycle it again!!
8) Could you share a sideboard upcycling project you've done or encountered, and what made it stand out?
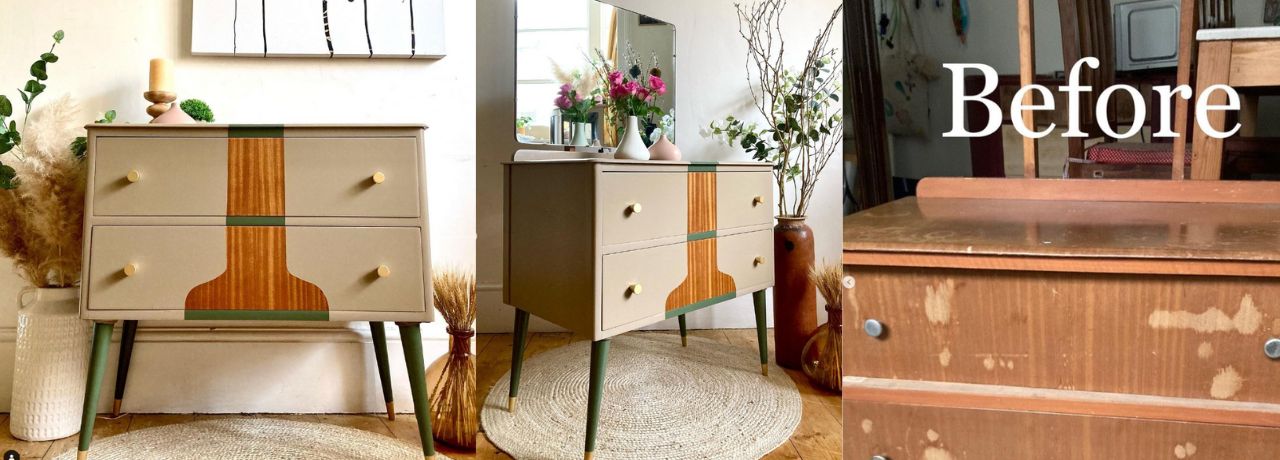
I recently did a big GPlan Mid-Century modern sideboard. I really didn’t like the orange finish on it but it was a cool piece in great shape.
I wanted a more coastal boho vibe, so after scraping and sanding the finish off, this was the first piece I ever bleached to experiment with wood lightening using household bleach!
It really was so effective, especially on the top.
I painted the rest with a fabulous retro stencil I had to the sides with a light blue/white combo and bleached light top! The customer wanted the piece but wanted it to sit in the middle of their room almost as a room divide, so I painted and stenciled along the back so it had a 360 feel to it. I loved the piece and the customer collaboration.
9) What are the most common mistakes to avoid during the sideboard upcycling process, and how can beginners overcome them?
I have made tonnes of mistakes, but they all helped me to improve!
- When using sandpaper, be sure to check if it is clogging up. That indicates a likely wax finish, so its best to scrape this with a carbide scraper first to get as much of the wax off, and then sand. This saves you tonnes of paper and sanding time!
- I would use an eco-friendly paint stripper on any carving details, as a machine sander could sand the detail away!!
- Use tape to neaten up paint lines, I can never get crisp lines free hand and it's that extra touch that can make all the difference!
- If the piece is veneer be careful not to sand through it! It requires a higher grit 120-240 as it is more fragile and you can burn through it! Or use a stripper to be on the safer side.
- Don’t skip sanding grits by jumping from very low to very high grit. The sequence of say 80, 120, 180 then 240+ to buff the piece works well. The finer papers are smoothing the scratches and blotches from the rougher grits to finish with the smoothest finish.
- Do the ‘scratch test'!. When your paint is dry, if your nail can scratch through it, then a part of the prep wasn’t done well enough. Sanding helps the paint have a surface to cling to, as does the use of the primer.
- And as mentioned at the start, do not skip on preparation… be patient and give yourself a realistic timeline to complete a piece. Be willing to make mistakes, because you will, but you will also learn from them!
10) What are your top 2 sideboard upcycles that you’re proud of and why?
Choosing only 2 favourites is like asking me to pick which of my kids I like best!
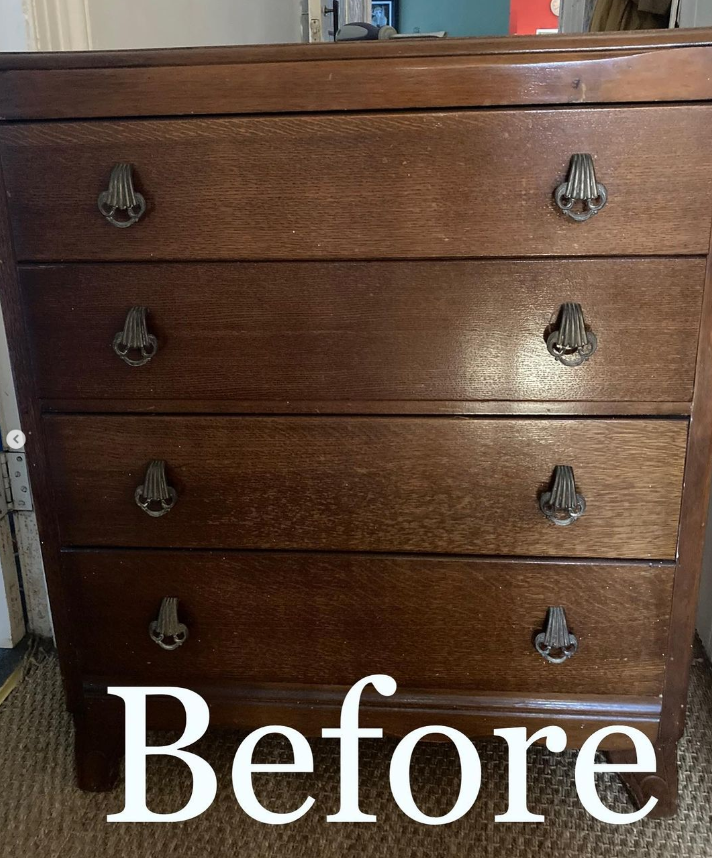
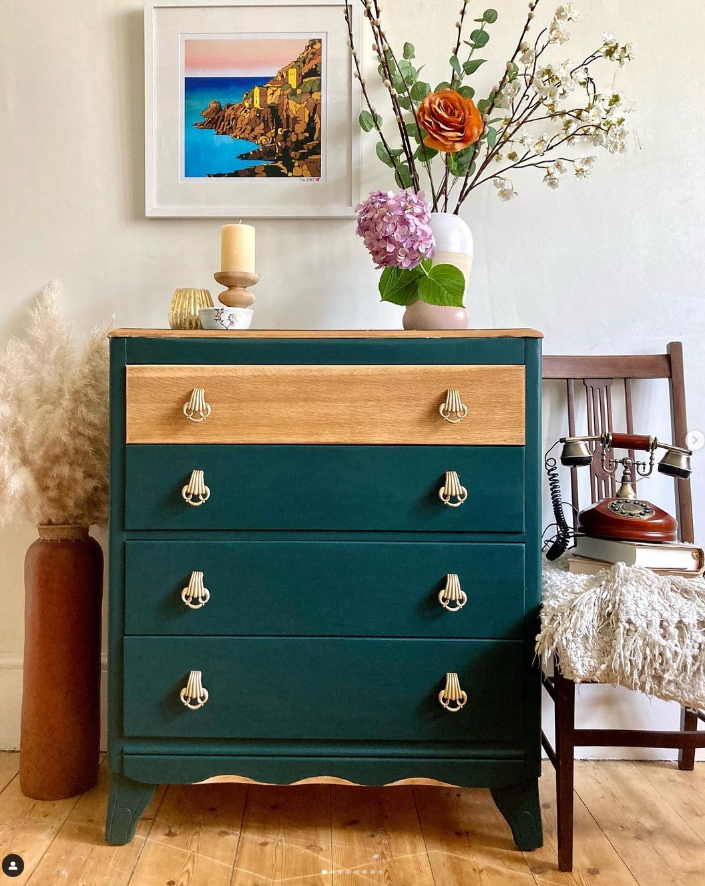
Well, 1 project that involved me making loads of repairs, (as the drawers were totally busted!), has to be up there.
I also remember really enjoying the design I created to break up the large expanse of the 2 huge wood doors. It was a really sexy piece, with all the curves and the most intense hardware which came up gorgeous when cleaned up.
The other one is more recent the Gpaln sideboard that was dated dull and orange! I Upcycled to get a Boho Coastal look, using bleach, washes, stencils, and fresh colours.
This piece tested me, I struggled to get all the finish off to get the bleach to penetrate but I just loved that I was able to achieve the look that I wanted and it was so totally transformed, whilst still honouring its retro chic.
Olya's Step By Step Guide To Upcycling A Sideboard...
- Start by cleaning the piece with sugar soap thoroughly. Dirt and grime can prevent the paint from sticking, and if sanded, can enter the grain
- I then remove the hardware to prepare the painting space.
- Clean the old hardware with a ratio of 50:50 water and white vinegar. Boil it for 20-30 mins before use. AWipe it with a cloth so that all grit comes off. You can use Bar keepers friend, which is an excellent product for cleaning old hardware, and you can bling it up again with metal paint or a ‘rub and buff’. Rather than improve the existing hardware, you can instead modernise it by adding something new. Hardware can be so effective in changing a look!
- Sand and scrape back the old finish. If you wanted a painted area then use 120 grit to ‘scuff sand it’ ie. remove the shine and give enough traction on the wood for the paint to cling.
If you wanted raw wood on the piece, then low grits to high to get all the old finish off for your choice of wash/stain/dye/varnish. - I tend to use tape to keep neat lines on doors and drawers or if your design incorporates a wood/paint combo.
- I seal my tape with clear varnish on the tape edge first, let it dry, and then paint for the perfect crisp paint line. Always remove the tape when the final coat is still wet to keep the lines crisp.
- Prime the piece to help prevent bleed through and for paint adhesion.
- Paint with a synthetic brush for fewer steaks or use a roller. Don’t overload either, thin and multiple layers is best.
Try not to over work the paint by going back and forth too much, as it will get streaky. - Light sand between paint coats with a fine sanding block again to smooth the finish.
- My final coat of paint is often put on feather light for the smoothest look.
- Maybe consider decoupaging or stencilling the inside doors to start with, just to add interest and detail and to help build your confidence
- Varnish the piece for extra durability. Use a thin varnish brush - again, being sure not to overload it or go over the same area too much.